Are you a teacher or facilitator looking to make your Zoom sessions more interactive and engaging for your participants? The Definitive Guide to Zoom Teaching 2021 consists of helpful tips from an experienced professional.
While it is intended primarily for classroom teachers in secondary school and college/university, anyone who has to facilitate a group session on Zoom will benefit from some or all of the tips discussed below.
- Theoretical Underpinnings
- 1. Get Support!
- 2. Prepare and Practice Before Class
- 3. Set Up Dual Monitors
- 4. Use “Gallery View” to Connect with Participants
- 5. Use “Share Desktop” for Screen Sharing
- 6. Encourage Students to Keep Cameras ON
- 7. Actively Monitor and Fully Utilize the Zoom Chat
- 7. Utilize Nonverbal Feedback – “Reactions”
- 8. Use “Polls” function
- 9. Require Authorized Users
- 10. Set Custom Names
- 11. Be a Breakout Room Rock Star!
In 2020, the pandemic thrust most of the world’s teachers into an uncomfortable situation: to go from face to face classes to online classes overnight.
As a result, many teachers were given Zoom accounts and told to teach their classes through the Zoom platform with little to no training or support. And the only real training and support they did get was technical in nature.
Zoom is easy to use, feature-rich, and affordable, making it the most popular communication platform during the pandemic. Anyone can use Zoom by downloading the app, or using the web version.
The biggest problem that most teachers and trainers face is how to connect with students over a videoconferencing platform. Our Definitive Guide To Zoom Teaching in 2021 will show you how to make the the most of Zoom and increase the interactivity in your remote teaching lessons.
Theoretical Underpinnings
Definitive Guide to Zoom Teaching in 2021
Even before the pandemic, the world was becoming more digitized. COVID-19 just accelerated it.
The following are some of the underlying principles of best practices of 21st century teaching upon which this guide has been constructed.
- Lectures are old fashioned. Coaching and facilitating are the new norm;
- Project-based learning is the best way to learn – through an integrated approach;
- Students need to be challenged to go outside their comfort zones;
- Learners need to be highly motivated;
- Participants should engage in collaborative teamwork;
- Iteration, scaffolding and critical inquiry are paramount for achieving outcomes.
If learners are constantly engaged and motivated to learn, then they will work harder to learn and retain knowledge. These ideas have been known by traditional classroom teachers for decades now.
So how do we bring it all online through Zoom?
“Engage and (in/ex)trinsically motivate learners with relevant content that is iterated and evaluated through a critical lens.”
Ian Rogers, Master of Education (UCalgary) : 20 years experience as an instructor and course developer
1. Get Support!
The requirements for teaching a class through Zoom are intimidating, especially if you are trying to really attract and get students’ attention. And in the distance teaching process, the cognitive burden of teachers is even greater than that of the traditional classroom.

Teachers must effectively:
- deliver course materials
- respond quickly to questions from multiple sources
- use communication tools
- create breakout rooms for group discussions &
- deal with unexpected technical challenges.
Technical challenges include: system crashes, power outages, weak Wi-Fi signals and connection drops, just to name a few. It’s very helpful to have more hands in order to deal with this confusion during class.
Try to get someone to support the technical aspects of your introductory course until you are more confident in the technology. If you have access to TAs, or advanced students who can help you, then make the most of them.
You can also CONTACT US FOR A NO OBLIGATION CONSULTATION!
If you are just starting out, especially if you are doing more than just showing a PowerPoint slide and lecturing, we suggest following the steps below to prepare:
2. Prepare and Practice Before Class
Because nothing can cause anxiety more than having more than 100 people watching you struggle with technology!
Things to practice and set up:
- Switch views;
- Switch between applications;
- Pre-load your PPT and other screen share content;
- Create breakout rooms.

Set up a new account so you can join as a student using a tablet or phone, or ask a friend to help you rehearse.
Practice until you feel confident and in control of your Zoom teaching environment.
3. Set Up Dual Monitors
Ideally use a laptop with an external monitor to create a second screen space. This allow for sufficient screen space to view PowerPoint slides and show the faces of students at the same time.
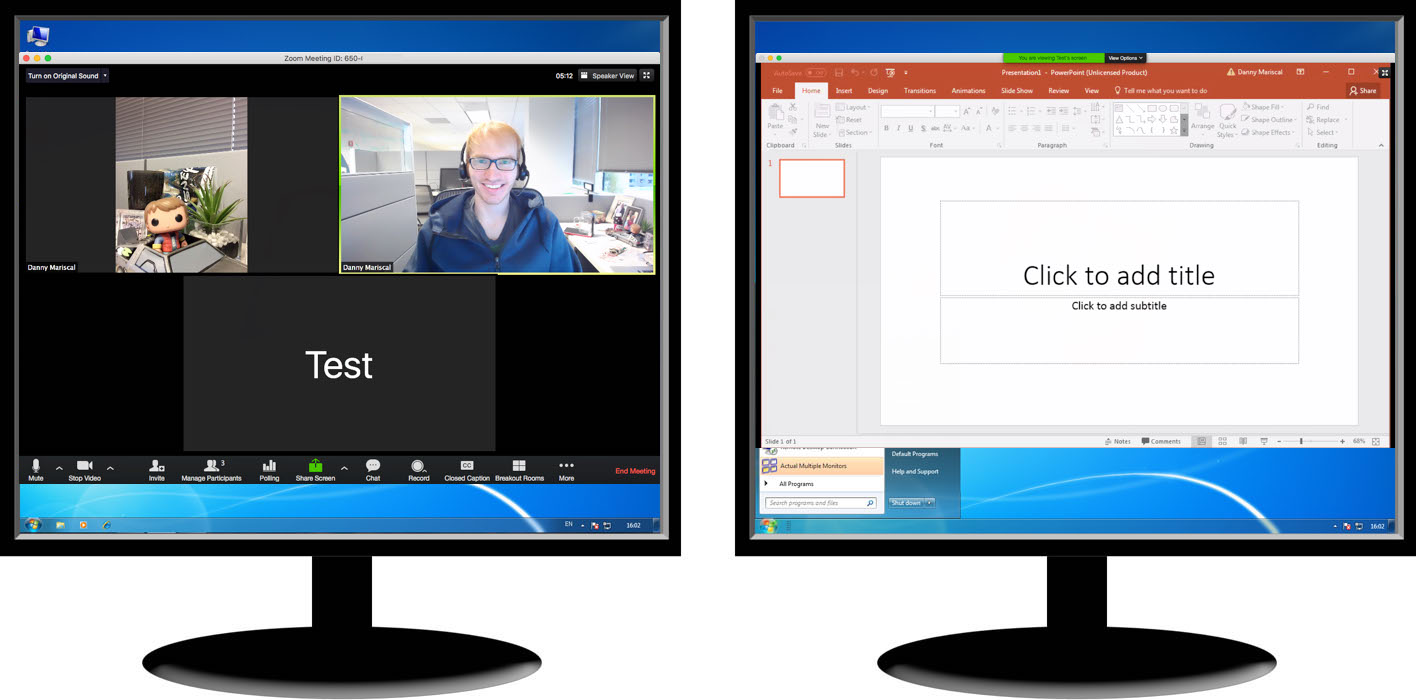
If you don’t have two computers or dual monitors, then you can always resize your windows to allow for everything on the screen to be visible and easily accessible. However, for the sake of this guide, we highly recommend a dual monitor setup for teachers.
4. Use “Gallery View” to Connect with Participants
Use the “Gallery View” in Grid format of “Zoom”, where 25 participants can be seen on each screen (some computers can display 50 students), and you can switch between screens to view the entire class.

You can even ask students to wave one by one. Comment on something in a person’s photo – acknowledge something they have on their wall or a book or offer a friendly and appropriate compliment on their appearance appearance.
5. Use “Share Desktop” for Screen Sharing
When using screen share, “Share Desktop” instead of a specific app. IF you are using a dual monitor approach, as recommended, then you have one screen that the students see, and the other screen where you can see the students.
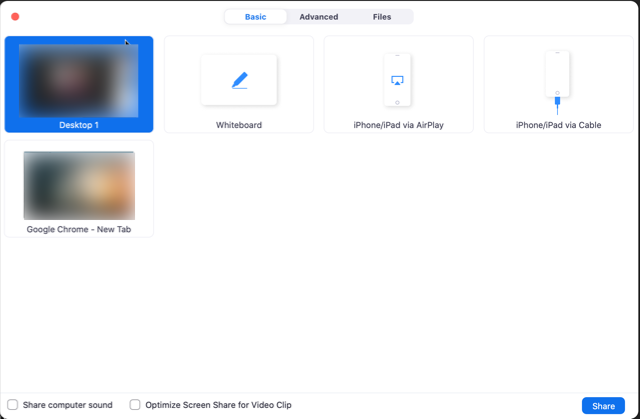
Once you have dual monitors set up and ‘share desktop’ activate on one of them, you can then easily drag different windows from your side screen onto the shared desktop (main screen) to show students.
Ideas for windows to share include PowerPoint slides, videos, course documents other applications (Canvas, Square, Mentimeter, Mural, StormBoard, Padlet, etc.)

6. Encourage Students to Keep Cameras ON
Assuming the internet connection can handle the video streaming.
Convey to your students the importance of building relationships with classmates and colleagues.
Explain how most opportunities in life will be obtained through their social networks. How humans use all available senses to form these connections and strengthen them. Perhaps they will be recognized in a job interview, or on the street some day because of a class or meeting in which they were an active video participant rather than a nameless icon or voice in the crowd.
Offer an inspiring motivation and more students will likely turn on their cameras and updated their profile photos.

Make the classroom as intuitive and “humane” as possible.
Point the camera at a close distance to your face and make eye contact with the camera.
Make your facial expressions as vivid and energetic as possible on the screen.
During interactive discussions with the whole class, used the Spotlight function to speak to everyone.

7. Actively Monitor and Fully Utilize the Zoom Chat
Chat is probably the most common way that students connect with each other, so they naturally will gravitate to the chat box in Zoom. Students will enter a lot of content in the chat that you may not have time to read in class.
Face to face video conversations are not always available to all students due to bandwidth or hardware limitations. Therefore, if someone tries to communicate using only text, it is important to pay close attention to the content of the chat.
Chatting during class may get out of control, so get students to focus on class and reduce back-channel communication.

Keep the “public chat” visible to all participants and close the “private chat” between all participants. Students can already communicate with each other in many different ways without having to use the private chat inside Zoom.
i. “Written answers to spoken questions”
Get students to use chat to write the answers to your questions. When they answer, will read some answers and respond.
Call the students by name and asked them to elaborate on the answers they posted in the chat room. They can use video with audio, pure audio or text to answer.
ii. “Auto-save” for post-class follow-up
The amount of chat discussions during class may overwhelm your reading and replying skills.
Set the chat to “auto-save” at the end of each course and check the course chat session to see if any important information was missed. Certain chats require follow-up emails to answer private questions missed during class.
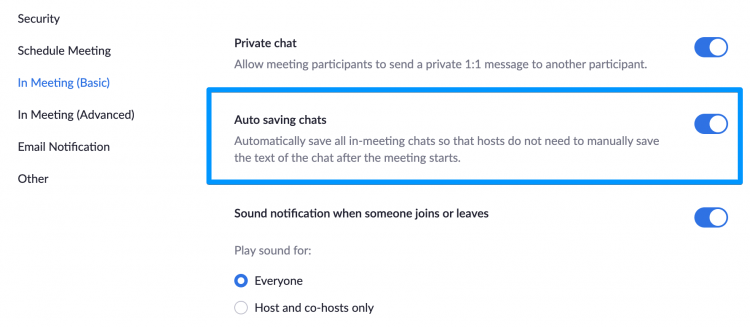
It’s important to remember that Zoom participants can only see the chat transcripts they posted in the meeting. Unfortunately, this means that facilitators cannot pre-fill important classroom information in class.
iii. Chat in the Breakout Rooms
In the breakout meeting room, the chat is localized and only visible inside each meeting room. However, when students are in a group discussion room, the moderator can use the chat function to communicate with all rooms immediately.
Send time reminders or other instructions that. Keep in mind that these broadcast messages arrive in their rooms in the form of small pop-up windows, which are sometimes ignored by participants. Students can also send a message to the moderator from the breakout room, asking their instructor to visit their room to answer questions.
The host can also send direct messages which is useful for communicating with a TA or support person from Icarus Learning Solutions who can be made a co-host, enabling them to move between breakout rooms to visit student groups and provide feedback on group projects.
7. Utilize Nonverbal Feedback – “Reactions”
Reactions can be obtained through the regular zoom toolbar, and two options are provided: thumbs up and clapping hands. Sometimes on smaller displays, the “Reaction” tab is hidden behind the “More” menu.
When displaying the “participant list”, non-verbal feedback is visible at the bottom of the “participants” list, including 11 options:
- Clapping Hands

- Thumbs up

- Heart

- Tears of Joy

- Open Mouth

- Party Popper (Tada, Celebration)

- Yes

- No

- Slower

- Faster

- Raise Hand / Lower Hand

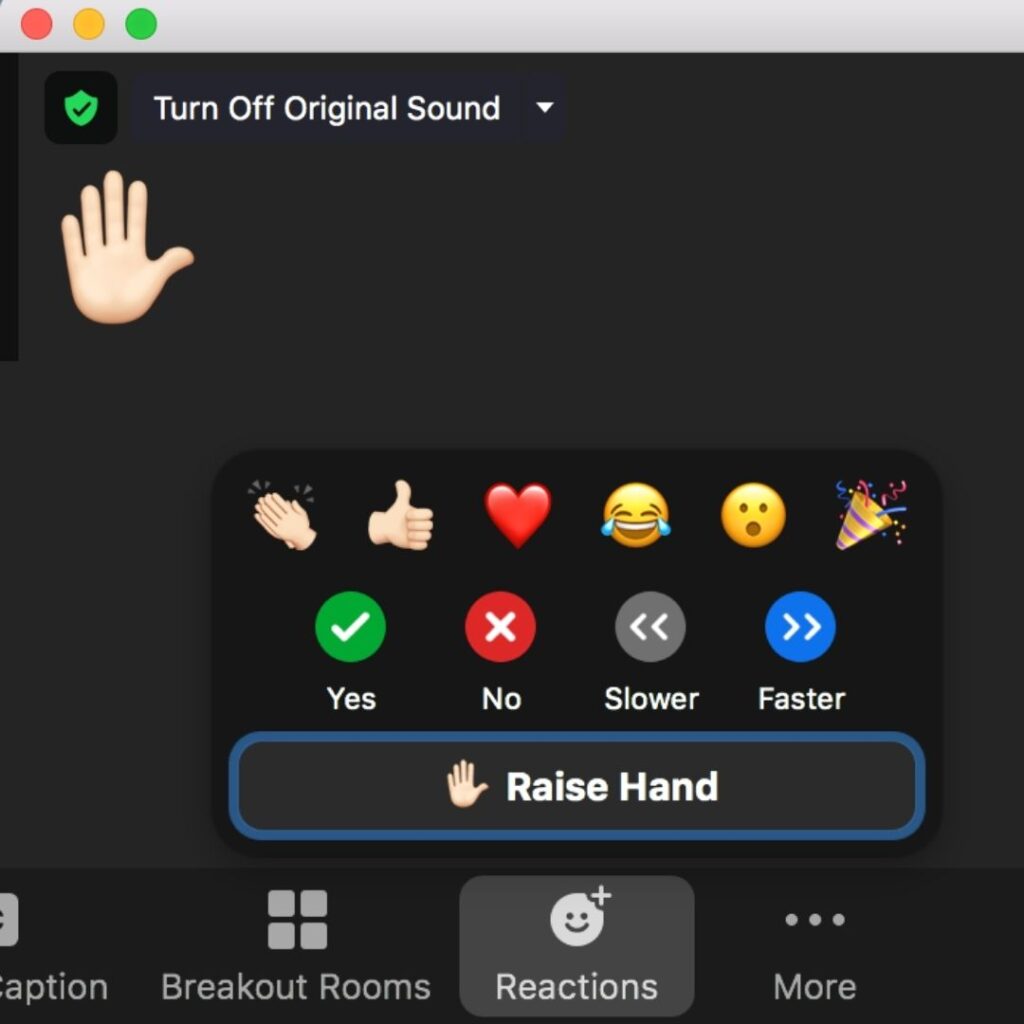
Using these symbols can provide a simple and quick way for poll students to answer questions such as: “Have you had a similar experience? Please select yes or no.”
Participants’ choices will also be displayed in the participant list next to each person’s name , So you can call students and ask them for their nonverbal answers.
This information is especially useful when looking for outliers in class polls to explore their less common answers in more depth.
8. Use “Polls” function
Compared with the rich features of dedicated polling tools like Mentimeter, Slido-all or Kahoot!, Zoom Polls is minimalist.
You can use polls by:
- Creating an ice-breaker at the start of class
- Let your class vote on what they want to do
- Get feedback on your class
Zoom has provided instructions for how to set up and utilize the polling function.
Definitive Guide to Zoom Teaching in 2021
9. Require Authorized Users
Requiring students to set up a Zoom account using their official college or work email address can solve two problems:
- Checking attendance becomes easy to manage.
- It is easy to set up pre-assigned breakout rooms.
When arranging your Zoom meeting, please select “Only authorized users can join: log in to Zoom” to restrict users with verified Zoom accounts to your meeting.

Some schools and colleges provide students with a formal Zoom account and integrate Zoom into their course management system without having to set up a special account for Zoom courses.
Definitive Guide to Zoom Teaching in 2021
10. Set Custom Names
Utilized custom Zoom names to help connect students with their specific class groups..
For example, A02-Mohamed (Mo) Sultan is Mohamed who prefers to be called Mo in Class A and Group 2.
By displaying the “Zoom Name” in the “Participants” list, you can easily identify students and quickly and manually sort them into appropriate breakout rooms during your session.

The Zoom name and profile photo can be changed in two locations in the Zoom Web Portal or the local client application.
To permanently change the “Zoom Name” during the course, you need to enter the name on the “Zoom Web Portal”, otherwise, even if you exit unexpectedly due to Wi-Fi instability, you will need to reset it every time you re-enter it.
Definitive Guide to Zoom Teaching in 2021
11. Be a Breakout Room Rock Star!
Zoom produced a great blog entry entitled: All You Need to Know About Using Zoom Breakout Rooms
Group discussion rooms are the secret sauce of distance learning; they allow students to study in groups and keep in touch with classmates, thereby helping to make the classroom more personalized and interactive.
“Zoom breakout rooms offer serious benefits for remote classes, making them more effective than face-to-face breakout groups.”
IAN ROGERS, MASTER OF EDUCATION (UCALGARY) : 20 YEARS EXPERIENCE AS AN INSTRUCTOR AND COURSE DEVELOPER
There are powerful breakout room options available available on Zoom.
Breakout rooms can be randomly assigned or pre-allocated in the Zoom Web Portal.
Zoom can accommodate up to 50 separate breakout rooms.

If you click “Edit this meeting”, then you can even “Upload .csv” list, which contains the meeting room name and the student’s email. Don’t forget to click the “Save” button at the bottom of the pop-up window.
After entering the meeting, click the “breakout room” tab, and then select “recreate pre-allocated meeting room” to make participants automatically invited to the pre-allocated meeting room.
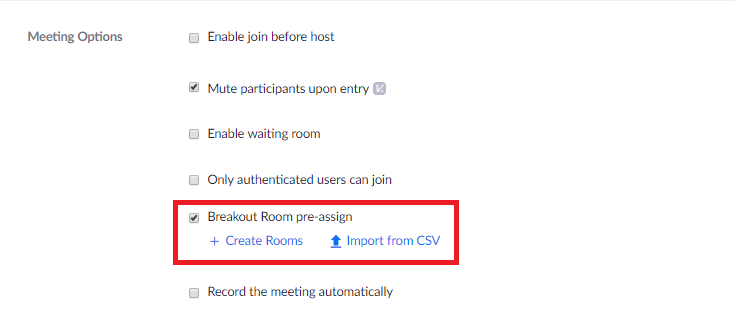
Then, the participant needs to accept the invitation to join the room, which is displayed as a pop-up window or displayed in their “Breakthrough Room” tab.
Definitive Guide to Zoom Teaching in 2021
i. Master the breakout room! Better than real life?
Zoom’s breakout rooms are great because you can transfer students and to any smaller ‘project’ specific group with just a few clicks of a button.
In Zoom, this is much easier and faster than in real life, because in real life, they need to be scattered and reorganized in different classrooms across campus.
With just a few clicks, teachers can access all their student groups, which is much easier than having to run around to all the physical rooms.
Teachers can also change the composition of the breakout room in a short time. If necessary, they can be reintegrate together in the main room.
The Zoom breakout room function provides great flexibility, which is different from the logistical and room reservation restrictions for face to face, which can cause complications and slow down the actual teaching and work time.
